The Complete Catalog of CNA Skills
Get Your Degree!
Find schools and get information on the program that’s right for you.
Powered by Campus Explorer
The Complete Catalog of CNA Skills
*** Remember, it’s up to you to find out the exact steps that you should follow for your state regarding CNA skills, you can find out more details from the CNA handbook you should have received from training ***
Washing hands
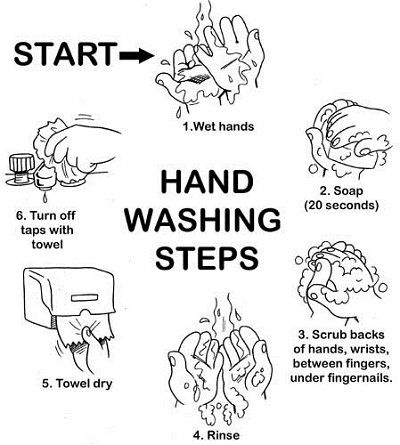 To prevent the transmission of disease, it’s crucial to wash your hands properly any time you may have come into contact with pathogens (dirt, microorganisms, etc.), even if you have worn gloves. This includes after feeding a patient, before and after patient contact, after touching soiled linens, and whenever you believe you have come into contact with anything that could be transmitted.
Some points to consider when washing hands:
- Remove any jewelry from hands
- Turn on warm water and wet your hands thoroughly
- Use a small amount of soap
- Lather your hands with soap for at least 20-30 seconds
- Have your hands pointed down below the elbows
- Do not touch any surfaces during the process
- Wash your hands even longer if contacted blood, urine, mucus, or vomit
- Rinse hands under warm water and dry your hands with a clean towel
How to wear/remove PPE (gown/gloves)
 PPE stands for Personal Protective Equipment, and it’s what you have to wear to prevent infection. In a medical setting, this refers to a gown, gloves, and possibly face protection. Gloves and gowns can only be used once in order to prevent the spread of disease. A gown and gloves should be worn any time there is the risk of touching infectious material or bodily fluids. If face protection is required, you will either wear goggles over the eyes or masks to cover the nose and mouth.
Some points to consider when wearing and removing PPE:
- Unfold the gown and place your arms through the sleeves, with the opening toward your back, and tie it tightly
- If face protection is needed, put on either the mask over your nose and mouth or goggles over your eyes in a way that your vision is not impaired
- Put gloves on last so that it covers the wrists and goes over the gown
- Remove PPE before leaving the patient’s room
- Remove gloves first and dispose of them properly
- Remove the gown and dispose of it properly
- Remove the face mask and dispose of it properly and remove the goggles and place them in the correct area for it to be contaminated
- Wash your hands after you have removed PPE
How to dress dependent patients
If a patient needs help dressing, you will have to learn how to assist them properly. However, before you do so, it is important to wash your hands prior to taking on the task. Also make sure that there are clean clothes available for the patient to wear and that you greet your patient and explain how you are going to help them dress or change clothes.
Some points to consider when dressing a patient:
- Have the patient undress on the side of their body that is weakest first.
- If your patient is having trouble undressing, assist them if necessary, although you should let the patient do most of it themselves
- Set the dirty clothes aside and put the clean clothes near the patient
- Keep close observation of your patient to make sure they aren’t feeling tired or dizzy and that you are proceeding safely
- Teach your patient to dress the strong side of their body first since it is easier, help if necessary
- Dispose of the dirty clothes in the proper receptable
- Wash your hands again before leaving
Ambulate with a gait belt
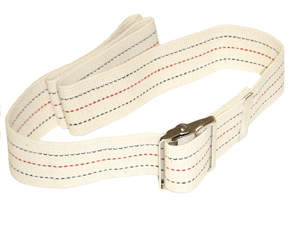 In order to keep a patient strong, they will need some regular exercise in order to prevent mobility and circulation problems. Patients who have trouble standing up and walking will require your assistance, as a fall can be disastrous and possibly cause severe injury. That’s why you will have to learn how to ambulate with a gait belt properly, which makes the process safer and more comfortable for the patient. Make sure that the patient has comfortable clothing on first and has slippers or shoes. If necessary, make sure the patient has their oxygen, IV, or walking equipment readily available.
Some points to consider when using a gait belt to ambulate:
- Lower the patient’s bed as far as it can go, making sure to lock the wheels
- Help the patient sit up so that their legs are hanging over the edge of the bed
- Use the transfer belt and apply it to the patient’s waist
- Stand in front of the patient, have the patient place their hands on the bed alongside the legs and have their feet on the floor
- Have the patient lean forward while you gold the transfer belt tightly
- Assist the patient into a standing position
- Once in a standing position, bring them their cane, walker, IV, or oxygen if necessary
- Assist the patient to walk by holding the gait belt
- Keep a close eye on the patient for any signs of dizziness, fatigue, shortness of breath
- Return the patient to their bed, remove the belt, and wash your hands before leaving
- Make sure the patient is safe throughout the process
Reposition patients on their side
To prevent a patient from getting bedsores or help them with the bed pan or linen changes, it will be necessary to help assist them in lying on their side. Oftentimes, you will need the assistance of a second person. Remember to wash your hands and put on a clean pair of gloves before. Greet your patient and explain that you are going to assist in turning them onto their side.
Some points to consider when helping a patient on their side:
- Raise the bed to a comfortable height that allows you to reach both sides of the bed
- Pull the patient to the side opposite of where they will be laying to keep them in the center of the bed (helps prevent falls)
- Pull the draw sheet up and toward you to roll the patient onto their side
- Have your patient grab the side rail as a safety precaution
- Place a pillow beneath the draw sheet and underneath the patient’s back for support, another underneath the buttocks, and a last on underneath the knees for comfort and support
- Return the patient to their original position and remove and dispose of gloves, making sure to wash your hands before leaving the patient’s room
Catheter care for females
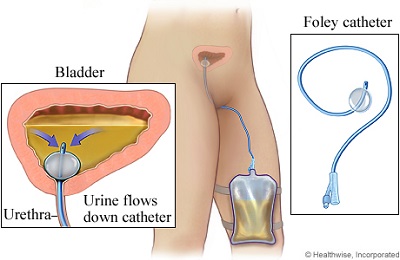 Some patients who are female won’t be able to move, making them helpless and therefore requires a high degree of care. These types of patients won’t be physically capable to move to the restroom, which means they’ll be given a catheter to urinate. A indwelling catheter is used for females, which runs inside the body and allows urine to drain from the bladder into a collection bag that resides outside of the body. Before you begin, as always, wash your hands, put on gloves, get your supplies ready, greet your patient, and explain the procedure.
Some guidelines to remember:
- Draw the curtains for patient privacy and adjust the patient’s bed to a comfortable height
- Fill a basin with warm water and gather towels and washcloths
- Make sure the patient is positioned comfortably, which should be on their back with their knees bent for females
- Place a waterproof pad underneath the patient between their midsection and buttocks, it is easiest to do this by turning the patient onto their side, placing the pad to cover half of the bed, and to do it again for the other side
- Place a towel over the patient’s navel area to provide privacy
- Remove the clothing around the perineal area with the patient’s permission
- Use your non-dominant hand to separate the labia, you should be able to see the catheter insertion site at the urethral meatus
- Check the perineal area for any abnormalities such as swelling, infection, or color
- Cleanse and dry the perineal area with a washcloth lathered with a little soap before doing the same to the catheter tubing with a new washcloth
- Return the patient to their original position and put their clothing back on
- Dispose of any materials used in the proper receptacles, return bed to normal height, record any data, and wash your hands before leaving
How to partially bathe patient
Some patients might have trouble bathing, so one of the necessary CNA skills to learn is how to partially bathe patients, which could occur daily. Partially bathing requires you to bathe a patient although you won’t have to move them, as this can be quite difficult and doing that daily can be exhausting. But before you are to bathe a patient, wash your hands and greet your patient, explaining the procedure you are about to perform.
Here are some pointers for partially bathing a patient:
- Get a basin full of warm water that is comfortable enough for the patient
- Make sure the patient has their privacy by drawing the curtain
- Remove as much medical equipment as you can
- Let the patient bathe themselves as much as they can, but you can always assist in bathing the harder-to-reach areas
- Make sure to thoroughly wash the major areas of the patient’s body, such as the face, arms, chest, stomach, legs, bag, and perineal area
- Change dirty linens (soiled or wet) if applicable
- Help the patient dress themselves afterward, making sure to let them do as much as possible
- Wash your hands again before leaving the room, and dispose of any supplies that might be contaminanted
Apply anti-embolism stocking
Patients who are recovering from surgery or not able to move will require an anti-embolism stocking in order to help boost the normal function of the venous and lymphatic systems while preventing pooling of blood in certain areas. Before performing this procedure, make sure you wash your hands and have everything you’ll need ready.
A necessary thing to learn regarding CNA skills, things to consider while applying an anti-embolism stocking are:
- Let your patient know the procedure you are going to perform
- Make sure the stocking will be able to fit the patient’s foot
- Have your patient lie straight on their backs and raise the bed to a comfortable height where you can perform the skill without exerting extra effort
- Make sure the patient’s feet are dry and if not, apply talcum powder
- Flip the sticking inside out by inserting your hand into the stocking, but leave a little where you can insert it into your patient’s heel
- Insert the sticking into your patients heel and begin rolling it upwards until it is above the patient’s knee
- Make sure there are no wrinkles in the fabric and that the patient is comfortable
- Return patient to original position and wash your hands before leaving the room
- Check your patient every once in a while to make sure everything is circulating properly and that your patient is comfortable
Transfer patient from bed to wheelchair
Some patients have trouble moving around which will require them to use a wheelchair to move from place to place. In order to assist the patient, you need to have the CNA skills to help transfer them from the bed to the wheelchair in a safe manner. In order to perform this skill, you should first wash your hands, grab your supplies (wheelchair and transfer belt), greet the patient, draw the curtain for privacy, and explain the procedure to them.
The process can be something like this.
- Roll the patient’s blanket below the patient’s feet and lock the bed wheels
- Help assist the patient to sit up with their legs hanging off the edge of the bed
- Assist the patient in putting on their shoes
- Move the wheelchair close to the patient’s side and make sure to lock the wheels
- Use the transfer belt to help the patient into the wheelchair by wrapping it around the patient’s waist, making sure it is secure but not too tight (should let 4 fingers fit)
- Put one foot in front of the patient’s feet in order to prevent the patient from slipping, hold the patient by the waist, have them place their hands on your shoulders, lift and turn the patient onto the wheelchair, and place the patient’s feet onto the foot pedals
- Wash your hands again before leaving the room
How to make an occupied bed
In order to change dirty linens while a patient is in their bed (oftentimes because they can’t leave the bed), you will have to learn the proper CNA skills to perform this correctly. Before you perform this skill, make sure you wash your hands before, put on new gloves, and that you greet your patient to let them know the procedure you are going to undertake. This is best done with two people.
Some tips to change an occupied bed:
- While changing an occupied bed, make sure that the patient is safe and not at risk of falling
- Roll the patient slowly onto their side in order to loosen the fitted sheet, rolling it toward the patient
- Have your clean fitted sheet ready to place on the area you just undid
- Roll the patient onto the clean sheet and remove the dirty linen
- Unfurl the rest of the clean sheet and fit it onto the entire bed
- Roll the patient onto their back and cover them with a sheet and blanket
- Ask if the patient is comfortable before leaving, making sure to wash hands, dispose of dirty linens in appropriate receptacle, and dispose of gloves
Perform passive range of motion
In order to help progress a patient’s recovery and prevent stiff joints and loss of function, passive range of motion will have to be performed on the patient, either on their elbows, wrist, shoulders, hip, knees, or ankles. Passive range of motion is one of the CNA skills that can only be performed with a doctor’s orders on a specific extremity, and can be done while the patient is in bed or having their bath. Make sure to wash your hands before starting and that you greet your patient, draw the curtain for privacy, and explain the skill you are undertaking.
Passive range of motion can be performed on a patient while in any of the following positions:
- Supine — patient lies flat on their back with arms to their sides
- Sims — patient is on either side with both legs straight
- Lateral — patient is lying on one side with their top leg flexed
- Semi-fowler — patient lies their back with the head of the bed at a 45 degree angle
- High-fowler — patient lies on the bed with the head at a 90 degree angle
To perform passive range of motion, follow these guidelines:
Passive range of motion to shoulder
- Raise the patient’s bed to a comfortable height for you
- Perform each exercise three times, moving the extremity slowly and smoothly
- Use an underhand grip when performing range of motion, not an overhand
- The shoulder will have to be moved up and down for flexion and extension, extended all the way up and returned to the bed
- The shoulder will have to be moved from side to side for abduction and adduction, moving the arm from their side until it is straight (kind of like making a snow angel)
- The shoulder will have to be moved around for rotation, which will require the arm to be rolled forward and backward
Passive range of motion to elbows and wrists
- Raise the patient’s bed to a comfortable height for you
- Perform each exercise three times, moving the extremity slowly and smoothly
- Use an underhand grip when performing range of motion, not an overhand
- The wrist will have to be moved up and down, side to side, and around. Up and down will require the patient to make a fist while bending the wrist up and down. Side to side requires an open palm and a motion like waving. The rotation will require the patient to make a fist and move it in a circular motion
- The elbow can only be moved in an up and down motion
Passive range of motion to hip, knees, and ankles
- Raise the patient’s bed to a comfortable height for you
- Perform each exercise three times, moving the extremity slowly and smoothly
- Use an underhand grip when performing range of motion, not an overhand
- The hip and ankles can be moved up and down, side to side, and around, while the knee is a hinge joint that can only be moved up and down
- The hip will have to be moved in a up and down motion, where the knees are bent toward the patient’s chest while in a supine position
- The hip will have to be moved from side to side, where there leg will be moved out to their side, similar to making a snow angel
- The hip will have to be moved around, where the leg is rotated around forward and backward
- The ankle will have to be moved up and down, where the foot is bent forward and back
- The ankle will have to be moved from side to side, where the foot is moved in a similar motion to waving a hand
- The ankle will have to be moved around, where the foot is rotated in a circular motion
Measure and record radial pulse
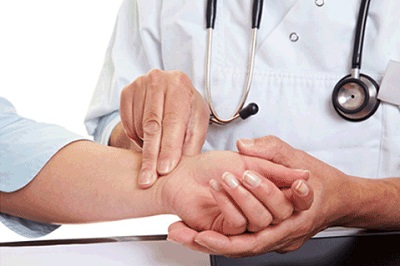 It’s important to keep track of your patient’s radial pulse in order to assess their condition, as it can prevent disasters later on. This can be done by using your fingertips to feel the wave of blood that passes through an artery. Before performing the task, wash your hands thoroughly and greet your patient, explaining the steps you are going to take to measure and record their radial pulse.
CNA skills require practice, here are some tips:
- Have the patient extend their arm and take hold of their hand
- Make sure you are able to locate the radial artery at the wrist
- Apply light pressure with your fingertips (index and middle finger), once you feel the patient’s pulse you can start counting the number of beats within a thirty second time span
- To get the radial pulse of a patient, multiply the number of beats in half a minute by two
- If the pulse isn’t normal, count again for a whole minute
- Document the patient’s radial pulse onto the correct chart
- Wash your hands before documenting the patient’s radial pulse onto the correct chart
- A normal pulse is around 60 to 100 beats per minute
- The pulse should not feel too weak or have an irregular rhythm, if either, report to a nurse
- Some medications, drugs, exercise, stress, caffeine can increase or decrease heart rate
Measure and record respiration rate
Measuring a patient’s respiration rate is important for finding out whether their breathing is normal or not. Abnormal respiration could be a sign of something more serious.
Some tips to measure and record respiration rate:
- Monitor a patient as they breathe, taking note of the rise and fall of the chest as one respiration
- Keep counting the number of breaths for one minute
- If abnormal breathing is occurring, notify a nurse or other staff members
- Document the respiration rate onto the correct chart
- Wash your hands again before leaving the patient’s room
- A normal respiration rate is between 12 and 18 breaths per minute
- Medications, pain, stress, exercise, or illness can affect respiration rate
Measure and record blood pressure
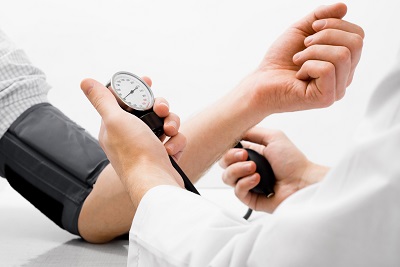
A complete list of CNA skills wouldn’t be complete without measuring and recording blood pressure, which is a very common practice. High or low blood pressure can be a sign of a more serious issue, which may require medical assistance. Before undertaking this task, make sure your equipment is clean, your hands are washed, and you have greeted the patient and explained the procedure.
Things to consider while measuring and recording blood pressure:
- Wrap the blood pressure cuff around the patient’s arm just above the elbow and make sure it isn’t too tight
- Position the stethoscope’s bell over the brachial artery
- Pump the ball of the cuff to about 150 to 180 mmHg in order to determine blood pressure
- Loosen the dial on the cuff lightly and listen through the stethoscope, take note of the first pulse, which is the upper number known as the systolic pressure
- Once the pulse starts to fade away, take note of the meter’s level. This second measurement is the lower number known as the diastolic blood pressure
- Wash your hands before documenting the measurements onto the correct chart, most often the blood pressure is calculated as systolic over diastolic
- Clean the equipment before leaving
Measure and record height/weight
Most often when a new patient arrives, their height and weight will need to be recorded, and this is one of the necessary CNA skills you’ll need to know. Height and weight is also tracked throughout their stay. Wash your hands and greet your patient before starting the procedure. Best done with two people.
Some tips on measuring and recording height and weight:
- Lower the bed until the patient is lying flat
- Gently roll your patient to their side onto a bath blanket and place a bed scale underneath the patient
- Use the bath blanket to mark where the patient’s top and bottom are
- Observe the bed scale to get the weight measurement
- Remove the bath blanket, bed scale, and return the patient to a comfortable position
- Measure the bath blanket to measure the patient’s height
- Wash your hands before recording both measurements into the appropriate chart
Measure and record urinary drainage bag
Measuring a patient’s urinary drainage bag will let staff members know if the patient’s kidneys are working properly. Before performing this skill, make sure you have washed your hands, put on new gloves, and that you understand the procedure. You will likely measure the urinary output with one of the methods: for patients who are wearing an indwelling catheter or for patients who cannot move using a bedpan.
For an indwelling catheter:
- Observe the side of the collection bag to find markings. A normal measurement will be between 30 and 400 ccs per hour. More or less and a nurse should be alerted
- The urine should be clear and a pale yellow, anything unusual (blood, cloudiness, different colors, and sediment) should be reported to a nurse.
- Replace the catheter if necessary, wash hands again before recording the results or leaving the room
For a bedpan:
- Allow the patient privacy while using the bedpan by drawing the curtain
- Lower the bed until the patient is lying flat and roll them onto their side
- Remove the bedpan, make sure that the patient is clean, and return them to a comfortable position
- Measure the urine output and dispose of it properly afterward (often through the toilet)
- The urine should be clear and a pale yellow, anything unusual (blood, cloudiness, different colors, and sediment) should be reported to a nurse
- Wash your hands again before recording the results or leaving the room
Oral care
Oral care is provided for patients who are either conscious or unconscious, and maintaining oral health is very important in preventing disease and decay. Make sure you wash your hands, use a new pair of gloves, greet your patient, and explain the procedure you are going to perform prior to starting.
Steps for providing oral care are as follows:
Conscious patient
- Put a towel over the patient’s chest to prevent a mess
- Increase the height of the bed to a comfortable position for yourself and raise the head at an angle
- Ask the patient to open their mouth and with a toothbrush, clean the patient’s teeth, gums, and tongue with a small amount of toothpaste
- Observe the mouth for any signs of infection
- Either ask the patient to rinse their mouth or if they cannot, suction the saliva and toothpaste
- Return your patient to their original position, remove gloves, and wash your hands before leaving
Unconscious patient
- Put a towel over the patient’s chest to prevent a mess
- Increase the height of the bed to a comfortable position for yourself and raise the head at an angle
- Use a tongue depressor to open the patient’s mouth
- Clean the patient’s teeth, gums, and tongue with a toothbrush, using a small amount of toothpaste
- Once finished cleaning, suction the saliva and toothpaste
- Return your patient to their original position, remove gloves, and wash your hands before leaving
Fingernail care
A patient’s nails should be kept clean and trimmed to prevent infection and scratching of their own skin. Do not perform nail care if the patient is in anti-coagulation therapy or has diabetes. Make sure that it is okay to provide nail care for the patient first by checking with the reports. Before beginning, wash your hands, wear gloves, greet your patient, and explain the process to them.
Some guidelines to follow when providing fingernail care:
- Have your scissors or trimmers ready by cleaning and sterilizing them beforehand
- Cut each nail so that it is smooth with no irregular edges, making sure not to cut too deep
- Inspect the nail beds for any signs of inflammation or fungal growth, anything unusual should be reported to the nurse
- Removes your gloves, dispose of them, and wash your hands before leaving the room
Foot care
Foot care is provided to patients in order to prevent infection whilst keeping it clean. The foot will have to be washed, rinsed, dried, and lotion will be applied. Before performing the skill, make sure your hands are washed, gloves are worn, you have greeted the patient, drawn the curtain for privacy, and explained the procedure.
To provide foot care, follow these steps:
- CNAs are not allowed to cut or trim toenails
- Place a barrier on the ground to prevent messes and place your supplies on the barrier (lotion, washcloths, towel, soap, and basin)
- Fill the basin with water until it is one quarter to half way full
- Remove the patient’s shoes or socks if necessary
- Lift the patient’s foot above the basin and inspect for any abnormalities
- Place the patient’s foot into the basin and let soak for 5 to 10 minutes
- Place washcloths into water and place the patient’s foot onto the towel
- Wring the washcloth and apply soap, using it to wash all areas of the patient’s foot
- Place the patient’s foot back into the basin and use the second washcloth to rinse
- Again, place the patient’s foot onto the towel and dry all areas
- Apply lotion to all parts of the patient’s foot except in between their toes
- Place shoes or socks back on if necessary
- Clean the wash basin, dispose of washcloths and towels to appropriate receptacles, and wash your hands before leaving the room
- Any abnormalities like rashes, wounds, bruises, blisters, or cuts should be reported to a nurse
Perineal care
For patients who have used the bedpan, are receiving a daily bath, or are incontinent, perineal care is provided to keep the patient’s skin clean from infection. If not done, this can lead to infection of the bladder and kidneys. Before starting, wash your hands, use a pair of gloves, greet the patient, and explain the tasks.
Some tips to consider while providing perineal care:
- Have the patient open their legs or do it yourself if they cannot
- Use a washcloth with warm water to clean the skin of the perineal area from front to back, never the other way around
- Inspect the perineal area for any sign of infection (lesions, swelling, boils, rashes, or tenderness), if so, report to a nurse
- Dry the skin once you have finished cleaning the perineal area
- You can only use a clean washcloth once to wash the perineal area each time, never reuse them
- Replace dirty bed linens if soiled or wet
- Dispose of washcloths and dirty linens into the correct receptacle. Return the patient to a comfortable position, dispose your gloves, and wash your hands before leaving
Clean upper or lower denture
Some patients might have dentures that will require routine cleaning, as they are expensive to replace and can cause infections of the mouth. Before you start cleaning a patient’s dentures, make sure you wash your hands, wear some gloves, have supplies ready, greet your patient, and explain the cleaning process. If the patient can remove their dentures on their own, all the better, but if they can’t you will have to gently remove the dentures by moving it up and down until the seal loosens, at which point you can slide the denture out.
Some guidelines when cleaning dentures:
- Fill a washcloth lined basin with warm water
- Use a toothbrush to scrub the denture’s surface as if it were teeth, including areas where it comes into contact with the gums and the roof of the mouth. You can apply a small amount of toothpaste or denture cleaner to help, and only work with one denture at a time
- Fill another cup with cool water
- Rinse the denture after cleaning and place it into the cup with cool water to prevent contamination
- Continue the process with the second denture
- Assist the patient with oral care and inspect the mouth for any infections, anything unusual should be reported to the nurse
- Apply dental adhesive and help the patient re-insert the dentures if they can’t do it themselves
- Return patient to a comfortable position, clean up your supplies, dispose of your gloves, and wash your hands before leaving the room
Assist with toiletry/bedpan
Another important one in the roster of CNA skills is learning how to assist patients with toiletry and using the bedpan. This is required for patients who can’t walk or stand and can help to prevent injuries, messes, and embarrassment on the patient’s part. Before you being, wash your hands, use gloves, greet your patient, and explain how you are going to assist with the use of the bedpan.
Some guidelines to follow:
- Make sure the patient has enough privacy by drawing the curtain
- Have the patient lie flat on the back and then carefully turn them onto their side
- Place the bedpan next to the patient’s buttocks and turn them onto their back again
- Make sure the bedpan is properly placed between the patient’s legs
- Leave to give the patient some privacy to do their business, you will have to remove and dispose of your gloves, making sure to wash your hands
- Once the patient is done, wash your hands again and put on gloves while making sure the patient still has their privacy
- Turn the patient onto their side and remove the bedpan, making sure to clean the buttocks, genitals, and perineal area
- Return the patient to a comfortable position and give them a damp cloth so that they may wash their hands
- Record the output and dispose of it as necessary
- Make sure the bedpan is cleaned or replaced afterward
- Remove and dispose of your gloves and wash your hands before leaving
Assist patients with eating
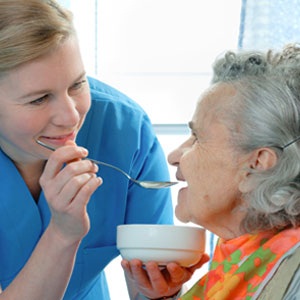 If a patient has trouble eating, it will be your responsibility to help feed them. Throughout the process, however, you should allow the patient to complete as much of the task as possible, only assisting them when they have trouble. Some patients might eat a little or might take a long time to do so, but don’t hurry them. Wash your hands before performing the task and explain to your patient how you are going to help.
To assist patients with eating, keep this tips in mind:
- Ask the patient what they are having trouble with and assist them as necessary. Open beverages, cut food into smaller pieces, cool food that is too hot, or feed patients directly if they cannot do it themselves
- Monitor the patient for any signs of trouble, making sure that each bite is completely chewed and swallowed